

Oh my goodness, let me tell you about *poached eggs*! They’re like little clouds of happiness that can elevate any breakfast from ordinary to extraordinary. Seriously, there’s something so elegant about a perfectly poached egg—those soft whites hugging a luscious, runny yolk just waiting to burst open! I remember the first time I learned to poach an egg; it was a game-changer. My breakfast transformed from a simple plate of scrambled eggs to something that felt fancy and gourmet, all without extra fuss.
This recipe is so straightforward, yet the results are so impressive. You don’t need fancy equipment or complicated techniques—just a pot of simmering water and a few simple ingredients. Trust me, once you get the hang of it, you’ll be poaching eggs like a pro in no time. They’re perfect on toast, in a salad, or even as a delightful topper for a bowl of grains. So, let’s dive into this deliciousness!
Ingredients List
- 4 large eggs
- 1 tablespoon vinegar
- Salt to taste
- Pepper to taste
That’s it! Just these few ingredients will give you the most delightful poached eggs. Make sure your eggs are fresh; they really make a difference in texture. And don’t skimp on the salt and pepper—they add the perfect finishing touch to your gorgeous eggs!
How to Prepare Poached Eggs
Alright, let’s get into the nitty-gritty of poaching eggs! It’s really a simple process, and I promise you’ll feel like a kitchen superstar once you master it. Follow these steps, and you’ll be on your way to egg perfection!
Step 1: Prepare the Water
First things first, grab a good-sized pot and fill it with water—enough so that the eggs can float around a bit. You want to bring that water to a gentle simmer, not a rolling boil. Trust me, this is key! A gentle simmer keeps the eggs from breaking apart and helps them cook evenly. You should see little bubbles forming on the bottom of the pot, but nothing too wild. This is where the magic happens!
Step 2: Add Vinegar
Next up, add a tablespoon of vinegar to the simmering water. This little step is so important because vinegar helps the egg whites coagulate faster, preventing them from spreading out in the water. So don’t skip it! You won’t taste the vinegar in the finished egg, but it makes a world of difference in how they turn out.
Step 3: Crack the Egg
Now, take a large egg and crack it into a small bowl. This is where you want to be gentle. You want to keep that yolk intact! If you crack it straight into the pot, and it breaks, it can get messy. Plus, using a bowl lets you check the freshness of the egg. Fresh eggs have a nice, firm white that holds together beautifully.
Step 4: Slide the Egg into Water
Okay, here’s the fun part! Gently slide the egg from the bowl into the simmering water. You can tip the bowl slightly and let the egg slide in slowly, which helps minimize splashing. If you’re feeling fancy, you can create a little whirlpool in the water with a spoon before adding the egg. This can help the egg white wrap around the yolk, giving you a lovely shape!
Step 5: Cook the Egg
Time to let the egg do its thing! Cook it for about 3 to 4 minutes. You want the whites to be set but the yolk to remain runny. Keep an eye on it; the whites should look opaque and firm, while the yolk peeks through like a golden treasure. If you’re unsure, you can poke the white gently with a spoon; if it feels solid, it’s done!
Step 6: Remove the Egg
Now, it’s time to carefully scoop out your poached egg using a slotted spoon. This allows any excess water to drain away, so you’re left with just the egg. Be gentle, as the egg is delicate and can break easily. Place it on a paper towel for a moment if you want to soak up any extra water.
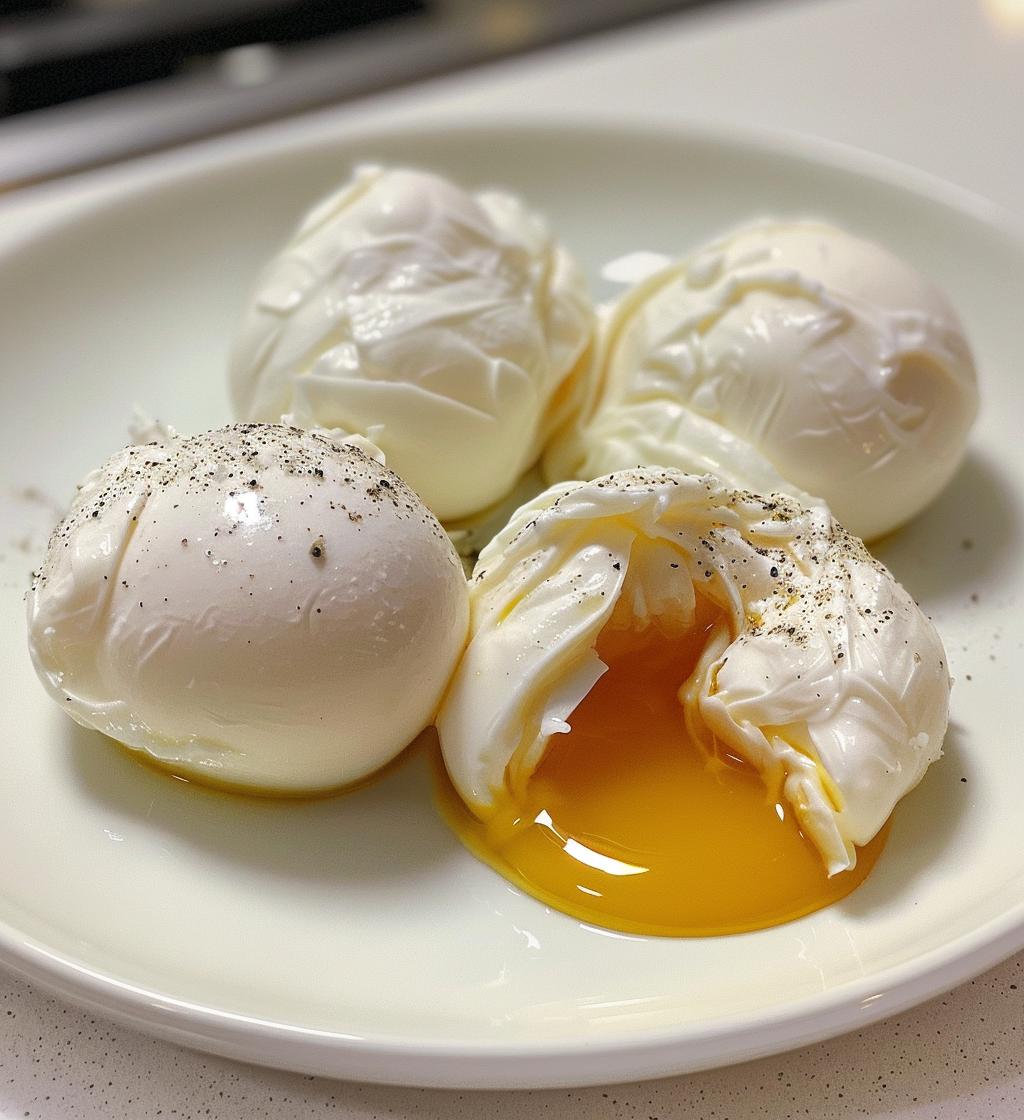
Step 7: Season and Serve
Finally, it’s time to season! Sprinkle a little salt and pepper over your beautiful poached egg. Oh, and don’t forget—these little gems are amazing on toast, in salads, or even on top of a grain bowl. They add such a lovely touch of elegance to any dish. Enjoy your delicious creation, and watch as your breakfast transforms into something special!
Why You’ll Love This Recipe
- Quick preparation—ready in just about 9 minutes!
- Healthy protein source to kickstart your day
- Incredibly versatile—enjoy them on toast, salads, or grain bowls
- Requires minimal ingredients, making it budget-friendly
- Perfect for impressing guests with a gourmet touch
- Customizable seasoning options to suit your taste
- Great for meal prep; they can be made ahead of time!
- Gluten-free and vegetarian-friendly—suitable for various diets
Honestly, once you start making poached eggs, you’ll wonder how you ever enjoyed breakfast without them! They add such elegance and flavor to any meal, and you’ll feel like a culinary rockstar serving them up. Trust me, you’re going to love it!
Tips for Success
Alright, my fellow egg enthusiasts, let’s talk about some tips to ensure your poached eggs turn out absolutely perfect every time! It’s all about those little details that make a big difference.
- Use Fresh Eggs: This is a biggie! Fresh eggs have firmer whites that hold their shape better, resulting in beautifully poached eggs. If your eggs are a bit older, they might spread out in the water, making them look less appealing.
- Adjust Cooking Times: Everyone has their own preference for yolk consistency. If you love a runny yolk, stick to the 3-minute mark. For a slightly firmer yolk, aim for 4 minutes. Test it out to find your sweet spot!
- Don’t Overcrowd the Pot: If you’re making multiple poached eggs, give them enough space to float around. Overcrowding can lead to a messy situation with eggs colliding and breaking.
- Keep the Water at a Gentle Simmer: The temperature is crucial! A gentle simmer is perfect for poaching. Too much boiling can break apart your eggs. Just keep an eye on the bubbles; they should be small and gentle, like a whisper!
- Add Salt After Cooking: While it’s tempting to season the water, adding salt can actually make the eggs tough. Instead, sprinkle salt and pepper on your eggs just before serving for that perfect flavor boost.
- Practice Makes Perfect: Don’t worry if your first few attempts aren’t picture-perfect. Poaching eggs is an art, and like any skill, it gets easier with practice. Have fun with it and enjoy the process!
With these tips, you’ll be well on your way to becoming a poached egg master! Each breakfast will feel like a little celebration, and I can’t wait for you to experience the joy of perfectly poached eggs!
Nutritional Information
Alright, let’s talk about the goodness packed into these poached eggs! Each egg is not just a delicious addition to your breakfast, but it also brings along some impressive nutritional value. Here’s a quick breakdown of what you can expect per serving (that’s one egg, just so you know!):
- Calories: 70
- Fat: 5g
- Saturated Fat: 1.5g
- Unsaturated Fat: 3g
- Trans Fat: 0g
- Cholesterol: 186mg
- Sodium: 60mg
- Carbohydrates: 1g
- Fiber: 0g
- Sugar: 0g
- Protein: 6g
Keep in mind, these values are estimates, but they give you a solid idea of how nutritious and satisfying poached eggs can be! They’re a great source of protein to fuel your day without weighing you down. So go ahead, indulge in those lovely eggs, and feel good about it!
FAQ Section
Alright, let’s tackle some common questions about poached eggs! I know you might have a few burning queries, so here are the answers to help you become a poached egg pro!
Can I poach more than one egg at a time?
Absolutely! You can poach multiple eggs, but make sure to give them enough space in the pot. Overcrowding can lead to messy eggs colliding, which we definitely want to avoid. A good rule of thumb is to stick to three or four eggs at a time, depending on the size of your pot.
What if my egg breaks while poaching?
Oops! It happens to the best of us. If your egg breaks, don’t panic! You can still salvage it by carefully scooping out the bits with a slotted spoon and using them in a scramble or on top of a salad. Just remember to crack your eggs into a bowl first next time to keep things tidy!
Can I make poached eggs ahead of time?
Yes, you can! Poached eggs can be made ahead and stored in the fridge for a day. Just make sure to place them in a bowl of cold water to keep them from sticking together. When you’re ready to eat, gently reheat them in hot (not boiling) water for a minute or so. They’ll be just as delicious!
What are some variations for serving poached eggs?
Oh, the possibilities are endless! You can serve poached eggs on avocado toast, over a fresh salad, or even on a bed of sautéed greens. They’re also fantastic with hollandaise sauce for a classic Eggs Benedict or topped with salsa for a bit of zing. Get creative and find your favorite combo!
Do I need to use vinegar every time I poach eggs?
While vinegar is helpful for keeping the egg whites together, it’s not strictly necessary. If you’re not a fan of the taste or don’t have any on hand, you can leave it out. Just keep the water at the right temperature and be gentle when adding the eggs, and you’ll still get great results!
There you have it! With these tips and answers to your questions, you’re all set to tackle poaching eggs like a champ. Enjoy the process and have fun experimenting with your poached egg creations!
Storage & Reheating Instructions
If you find yourself with leftover poached eggs (which is rare, but hey, it happens!), I’ve got you covered on how to store and reheat them while keeping that delightful texture intact.
To store your poached eggs, place them in a bowl filled with cold water. This helps prevent them from sticking together. Cover the bowl with plastic wrap or a lid and pop it in the fridge. They’ll keep well for about a day. When you’re ready to enjoy them again, just make sure to gently reheat them!
For reheating, fill a pot with water and bring it to a gentle simmer—just like you did when poaching them. Carefully place the cold poached eggs in the simmering water for about 1 minute. This warms them up without cooking them further. You want to avoid boiling water, as that can break apart the delicate eggs. Once they’re warmed through, scoop them out with a slotted spoon and serve immediately!
And there you have it! With these simple steps, you can enjoy your poached eggs even after a day in the fridge, keeping that lovely runny yolk and soft whites just as they should be. Happy cooking!
Print
Poached Eggs: 7 Simple Steps to Egg-cellent Breakfasts
- Prep Time: 5 minutes
- Cook Time: 4 minutes
- Total Time: 9 minutes
- Yield: 4 servings 1x
- Category: Breakfast
- Method: Poaching
- Cuisine: American
- Diet: Vegetarian
Description
Poached eggs are eggs that are cooked in simmering water for a delicate texture.
Ingredients
- 4 large eggs
- 1 tablespoon vinegar
- Salt to taste
- Pepper to taste
Instructions
- Fill a pot with water and bring it to a gentle simmer.
- Add vinegar to the water.
- Crack an egg into a small bowl.
- Gently slide the egg into the simmering water.
- Cook for 3-4 minutes until the whites are set.
- Remove the egg with a slotted spoon.
- Season with salt and pepper.
Notes
- Use fresh eggs for the best results.
- Adjust cooking time for desired doneness.
Nutrition
- Serving Size: 1 egg
- Calories: 70
- Sugar: 0g
- Sodium: 60mg
- Fat: 5g
- Saturated Fat: 1.5g
- Unsaturated Fat: 3g
- Trans Fat: 0g
- Carbohydrates: 1g
- Fiber: 0g
- Protein: 6g
- Cholesterol: 186mg
Keywords: Poached Eggs, Breakfast, Eggs