

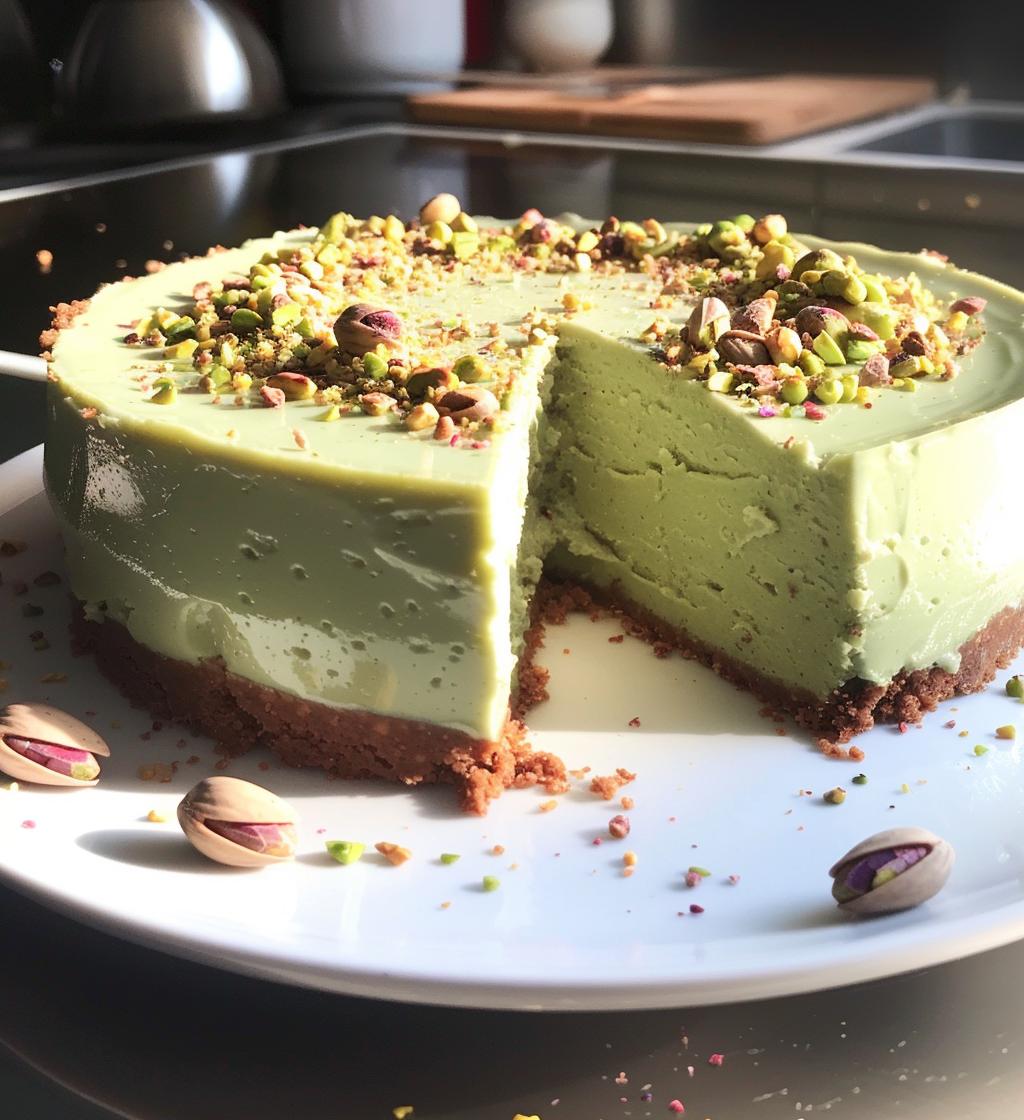
Oh, let me tell you about my absolute favorite dessert—Pistachio Cheesecake! It’s this dreamy, creamy slice of heaven that melts in your mouth, with a unique nutty flavor that just dances on your taste buds. I remember the first time I made it for my family gathering; the moment I took it out of the fridge, everyone flocked around, and the compliments poured in! There’s something so special about the vibrant green hue and the rich, buttery crust that makes it perfect for any occasion. Trust me, once you try this luscious cheesecake, you’ll never want to go back!
Ingredients List
Here’s what you’ll need to whip up this delightful Pistachio Cheesecake. I’ve made sure to list everything clearly so you can gather your ingredients without a hitch!
- 1 ½ cups crushed pistachios (make sure they’re finely crushed for that perfect crust!)
- 1 cup cream cheese (softened for easy mixing)
- ½ cup sugar (to sweeten things up just right)
- 1 cup heavy cream (for that luscious, creamy texture)
- 2 eggs (room temperature is best!)
- 1 tsp vanilla extract (for a hint of flavor)
- 1 tbsp lemon juice (adds a lovely brightness)
- ½ cup sour cream (optional, but it adds a wonderful richness)
Make sure everything is at room temperature for the best results. Happy cooking!
How to Prepare Pistachio Cheesecake
Preheat the Oven
First things first, you’ll want to preheat your oven to 325°F (160°C). This step is crucial because it sets the perfect environment for your cheesecake to bake evenly, giving you that smooth, creamy texture we all love. While the oven warms up, you can get everything else ready!
Prepare the Crust
Now, let’s make that delicious crust! In a bowl, mix your crushed pistachios with melted butter until everything is well combined. It should look like wet sand. Then, grab a springform pan and press the mixture firmly into the bottom. Make sure it’s even, so every bite of your cheesecake has that nutty flavor. I like to use the back of a measuring cup to get it nice and compact!
Make the Cheesecake Filling
Next up is the filling. In a large mixing bowl, beat together the cream cheese and sugar until it’s super smooth—this usually takes about 2-3 minutes with a hand mixer. Then, add in the eggs one at a time, mixing well after each addition. It’s important not to overmix, just until everything is incorporated. After that, stir in the vanilla extract, lemon juice, and sour cream until it’s all beautifully combined. You’ll want to give it a good scrape down the sides of the bowl to make sure there are no lumps!
Bake and Cool
Now for the best part—pour that luscious cheesecake filling over your crust in the springform pan. Smooth the top with a spatula and pop it into the oven. Bake for about 50-60 minutes, or until the center is just set but still has a slight jiggle. After baking, turn off the oven and crack the door open, letting the cheesecake cool in the oven for about an hour. This helps prevent cracking! Once it’s cooled to room temperature, transfer it to the fridge and let it chill for at least 4 hours (or overnight if you can wait!). Trust me; the flavors deepen and get even better with time!
Nutritional Information
Here’s the estimated nutritional breakdown for each slice of this creamy Pistachio Cheesecake. Keep in mind that these values can vary based on the specific brands you use, but they give you a good idea of what to expect!
- Calories: 350
- Fat: 25g
- Saturated Fat: 10g
- Unsaturated Fat: 12g
- Trans Fat: 0g
- Cholesterol: 80mg
- Sodium: 200mg
- Carbohydrates: 30g
- Fiber: 2g
- Sugar: 25g
- Protein: 6g
These numbers might just make you appreciate each creamy bite even more! Enjoy every indulgent slice, knowing it’s a special treat made with love!
FAQ Section
Can I use roasted pistachios for the crust?
Absolutely! Roasted pistachios add a deeper flavor to the crust, but make sure they’re unsalted. Just crush them up and you’re good to go!
How do I know when my cheesecake is done baking?
A perfect cheesecake should be set around the edges but still have a slight jiggle in the center. It’ll firm up as it cools, so don’t worry if it seems a little soft right out of the oven!
Can I make this cheesecake ahead of time?
Yes, yes, yes! In fact, chilling it overnight enhances the flavors. Just make sure to cover it well to prevent any fridge odors from sneaking in!
What should I do if my cheesecake cracks?
Cracks can happen, but don’t fret! If you let the cheesecake cool slowly in the oven with the door ajar, it helps prevent cracking. If it does crack, a little whipped cream or a topping can cover it up beautifully!
Can I substitute the cream cheese for a lighter option?
You can try using a low-fat cream cheese, but it might not be as rich and creamy. If you want to keep that luscious texture, I recommend sticking with regular cream cheese for the best results.
Why You’ll Love This Recipe
- Irresistibly Creamy: This Pistachio Cheesecake is so rich and smooth, it practically melts in your mouth with every bite!
- Unique Nutty Flavor: The combination of pistachios brings a delightful and distinct flavor that sets this cheesecake apart from the rest.
- Simple Preparation: With straightforward steps, you’ll find that making this cheesecake is a breeze, even if you’re a beginner!
- Impressive Presentation: The vibrant green hue of the cheesecake is not only eye-catching but makes it a showstopper at any gathering.
- Make-Ahead Friendly: This cheesecake tastes even better after a night in the fridge, allowing flavors to meld beautifully.
- Versatile Toppings: You can easily customize it with whipped cream, extra pistachios, or even a drizzle of chocolate to elevate your dessert experience!
Tips for Success
Want to make sure your Pistachio Cheesecake turns out absolutely perfect? I’ve got some tried-and-true tips that’ll help you nail it every time!
- Quality Ingredients Matter: Always use high-quality cream cheese and fresh pistachios. It makes a world of difference in flavor and texture. Trust me, you’ll taste the love in every bite!
- Room Temperature Ingredients: Make sure your cream cheese, eggs, and sour cream are at room temperature before mixing. This helps everything blend smoothly, avoiding lumps and creating a silky filling.
- Don’t Overmix: When you’re mixing the cheesecake filling, just blend until combined. Overmixing can incorporate too much air, leading to cracks during baking. We want a smooth texture, not a puffed-up cheesecake!
- Chill, Chill, Chill: Patience is key! Let your cheesecake cool in the oven with the door slightly ajar for about an hour after baking. This gentle cooling prevents cracks. Then, refrigerate it for at least 4 hours, but overnight is even better! The flavors deepen and it firms up beautifully.
- Water Bath Option: If you’re worried about cracks, consider using a water bath. Wrap your springform pan in aluminum foil and place it in a larger baking dish filled with hot water. This creates a steamy environment that helps your cheesecake bake evenly.
- Topping Time: Get creative with your toppings! A simple dollop of whipped cream or a sprinkle of crushed pistachios can elevate the presentation. You could even drizzle some melted chocolate for an extra indulgent touch!
Follow these tips, and I promise you’ll be serving up a show-stopping Pistachio Cheesecake that everyone will rave about. Happy baking!
Storage & Reheating Instructions
Got leftovers? No problem! This Pistachio Cheesecake can easily be stored to enjoy later. First, let it cool completely after baking, then cover it tightly with plastic wrap or aluminum foil to keep it fresh. If you haven’t already, pop it into the fridge for up to 5 days. Just make sure it’s well-covered to prevent any odors from the fridge sneaking in!
If you want to keep it longer, you can freeze it! Simply wrap individual slices in plastic wrap and then place them in an airtight container or a freezer bag. It’ll stay good for up to 2 months. When you’re ready to enjoy a slice, just take it out the night before and let it thaw in the fridge. No need to reheat—this cheesecake is best enjoyed chilled!
But hey, if you find yourself craving it a little quicker, you can let it sit at room temperature for about 30 minutes before serving. That way, it’ll soften ever so slightly, making every creamy bite even more irresistible. Just remember, no microwave for this beauty—she’s perfect as is!
Print
Pistachio Cheesecake: 7 Steps to Creamy Perfection
- Prep Time: 20 minutes
- Cook Time: 60 minutes
- Total Time: 4 hours 20 minutes
- Yield: 8 servings 1x
- Category: Dessert
- Method: Baking
- Cuisine: American
- Diet: Vegetarian
Description
A creamy and rich pistachio cheesecake with a nutty crust.
Ingredients
- 1 ½ cups crushed pistachios
- 1 cup cream cheese
- ½ cup sugar
- 1 cup heavy cream
- 2 eggs
- 1 tsp vanilla extract
- 1 tbsp lemon juice
- ½ cup sour cream
Instructions
- Preheat the oven to 325°F (160°C).
- Mix crushed pistachios and melted butter to form the crust.
- Press the mixture into the bottom of a springform pan.
- In a bowl, beat cream cheese and sugar until smooth.
- Add eggs, one at a time, mixing well after each addition.
- Stir in vanilla extract, lemon juice, and sour cream.
- Pour the cheesecake mixture over the crust.
- Bake for 50-60 minutes until set.
- Let cool and refrigerate for at least 4 hours before serving.
Notes
- Use unsalted pistachios for better control of saltiness.
- Chill the cheesecake overnight for better flavor.
- Top with whipped cream or extra pistachios if desired.
Nutrition
- Serving Size: 1 slice
- Calories: 350
- Sugar: 25g
- Sodium: 200mg
- Fat: 25g
- Saturated Fat: 10g
- Unsaturated Fat: 12g
- Trans Fat: 0g
- Carbohydrates: 30g
- Fiber: 2g
- Protein: 6g
- Cholesterol: 80mg
Keywords: Pistachio Cheesecake, Cheesecake, Dessert, Pistachio